Python x CV
本文最后更新于:Thursday, December 24th 2020, 9:06 pm
Installation
python opencv包的官方网址: https://pypi.org/project/opencv-python/
opencv官网网址 : https://docs.opencv.org/master/
直接通过pip安装(有图形界面的PC)
- 选择1:包含主要的模块:
pip install opencv-python - 选择2: 全部安装(有些额外的模块) :
pip install opencv-contrib-python
- 选择1:包含主要的模块:
没有图形界面的服务器上(与👆对应)
pip install opencv-python-headlesspip install opencv-contrib-python-headless
尝试用
conda install open-cv,但是找不到包
Common Usage
导入的包为
cv2
1. 读取图像
1 | |
返回值: 像素矩阵
[height, width, channel]类型:
numpy.ndarray;数据类型:
unit8;通道:
BGR, 不是RGB; 可以通过src[:,:,::]转换
注意:每个像素的数据类型一定要uint8;否则会出现
error: (-215:Assertion failed) src_depth != CV_16F && src_depth != CV_32S in function ‘convertToShow’
解决办法: np.uint8(image)
2. 显示图像
1 | |
3. 缩放图像
1 | |
参数说明:
- src: 读入的图像, [height, width, channel]
- dsize: 变换后的宽和高(width, height) —> (int, int)
- dst: 与src相对应, 即变换完的各点像素矩阵
- fx: x方向(即width方向) 缩放倍数
- fy: y方向(即height方向)缩放倍数
- interpolation: 插值方法
- notes: 转换后的尺寸要么由
dsize要么由fx,fy来决定
| 插值方法 | 解释如下 |
|---|---|
| INTER_NEAREST | 最近邻插值(0) |
| INTER_LINEAR | 双线性插值(默认设置)(1) |
| INTER_AREA | 使用像素区域关系进行重采样(最适合shrink) |
| INTER_CUBIC | 4x4像素邻域的双三次插值 (2) |
| INTER_LANCZOS4 | 8x8像素邻域的Lanczos插值(3) |
如果你已经创建了dst(转换后的尺寸由dst来决定)
1
resize(src, dst.size(), dst)修改图片尺寸
1
2
3
4
5
6
7
8
9
10
11
12
13
14
15
16
17
18
19
20
21
22
23
24
25
26
27
28
29
30
31
32
33
34import cv2
import numpy as np
def letterbox_image(img, inp_dim):
"""resize image with unchanged aspect ratio using padding
img: input image
inp_dim:
"""
img_w, img_h = img.shape[1], img.shape[0] # img:[height, width, channel]
w, h = inp_dim
scale = min(w / img_w, h / img_h) # keep aspect ratio
new_w = int(img_w * scale) # multiply the same number
new_h = int(img_h * scale)
# 表示大小时用的是(width,height) --> 返回的是[height, width, channel]
resized_image = cv2.resize(img, (new_w, new_h), interpolation=cv2.INTER_CUBIC) # cubic
cv2.imshow("unchanged aspect ratio", resized_image)
canvas = np.full((h, w, 3), 128) # create a numpy array having shape of [width, height, c]
# padding with (128,128,128) gray
canvas[(h - new_h) // 2: (h - new_h) // 2 + new_h, (w - new_w) // 2:(w - new_w) // 2 + new_w, :] = resized_image
return canvas
if __name__ == "__main__":
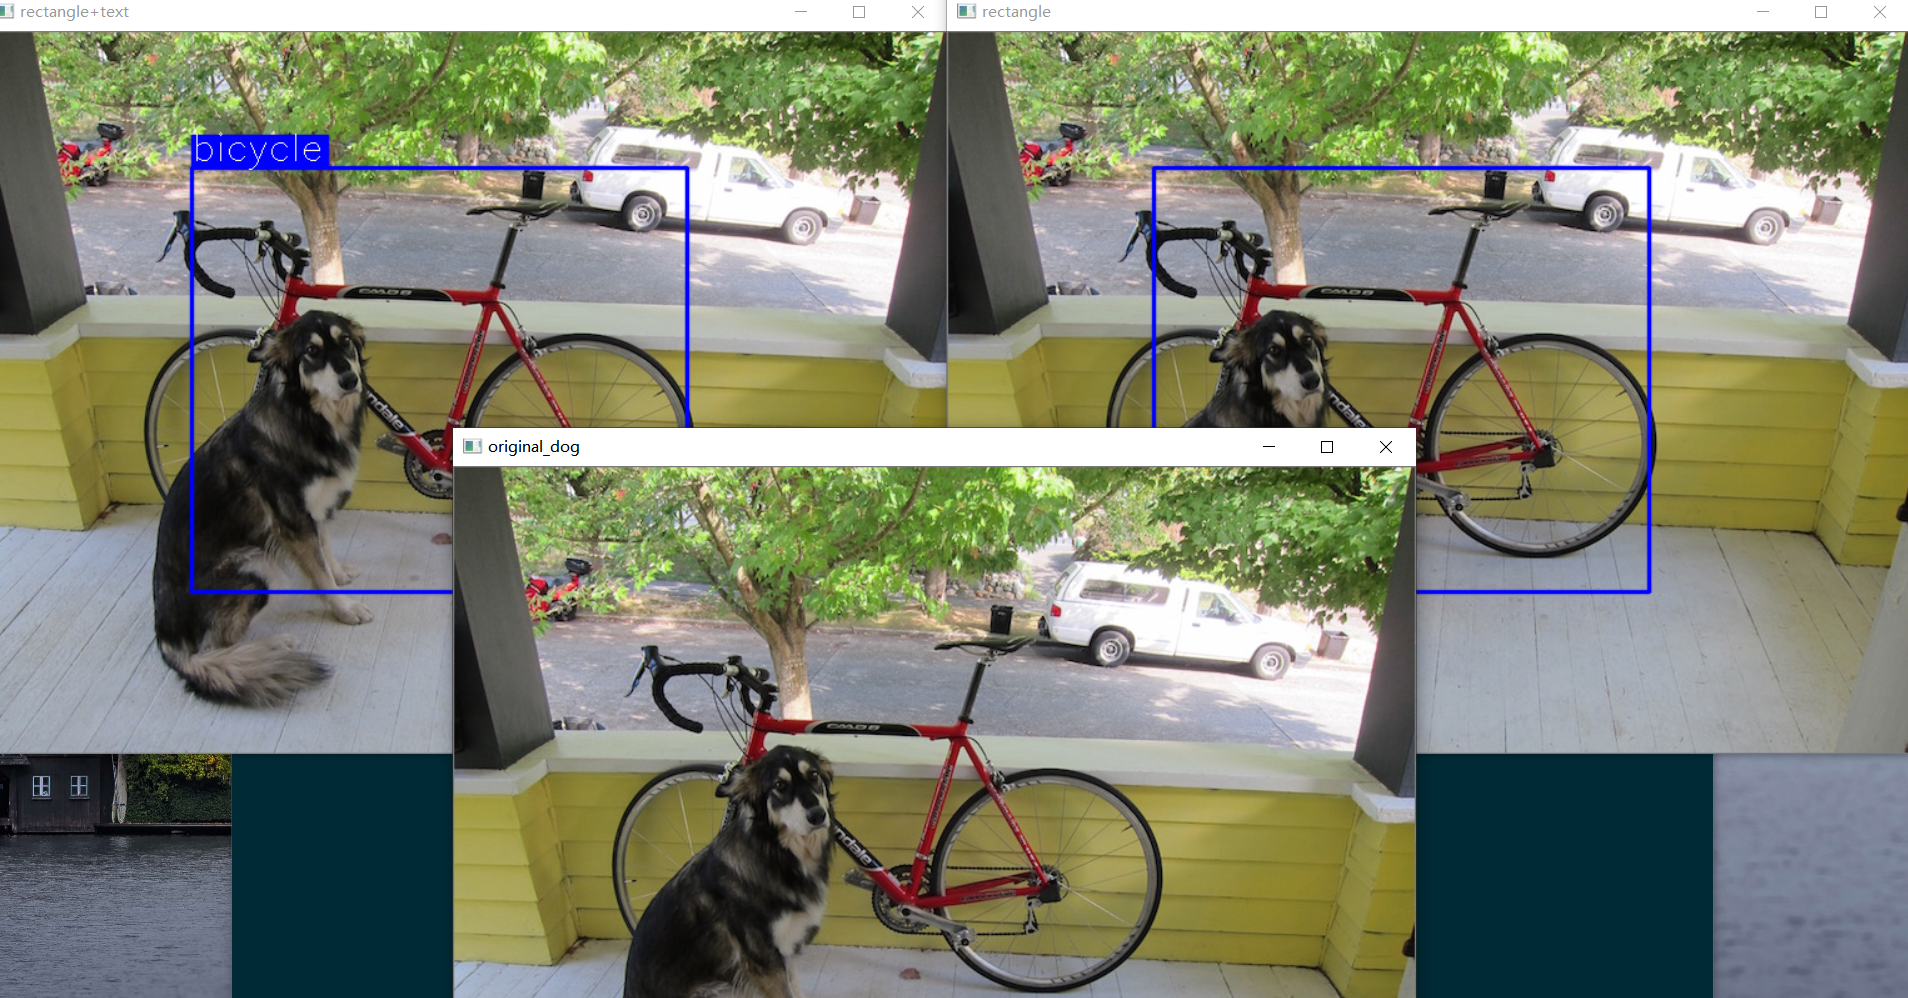
filename = "dog-cycle-car.png"
dog = cv2.imread(filename)
cv2.imshow("original_dog", dog)
shrink_dog = cv2.resize(dog, None, fx=0.5, fy=1, interpolation=cv2.INTER_CUBIC)
dog_keep_ratio_padding = np.uint8(letterbox_image(dog, (dog.shape[0] // 2, dog.shape[0] // 2))) # height/2
cv2.imshow("dog_keep_ratio_padding", dog_keep_ratio_padding)
cv2.imshow("shrink_dog", shrink_dog)
cv2.waitKey(0)
cv2.destroyAllWindows()- 一定要使用
cv2.waitKey(0),否则显示不了图片:(正数为等待的时间,单位毫秒) - 使用cv2.destroyWindows(“winname”),可以主动关闭窗口(图片)

- 一定要使用
4. 在图像上画矩形)
1 | |
The function cv::rectangle draws a rectangle outline or a filled rectangle whose two opposite corners
are pt1 and pt2
pt1,pt2: 两个对角的坐标
color: tuple(R,G,B)
thickness: int 如果为负数,比如-1,那么会填充整个矩形
lineType: 8(默认):8连接;4:4连接线;CV_AA:锯齿线
注:对于整数坐标的非反锯齿线,使用8连接或4连接的Bresenham算法。粗线以圆角结尾绘制。反锯齿线是用高斯滤波绘制的
shift: 点坐标中的小数位数
5.在图像上写字
1 | |
对于不能渲染的symbol,使用?标记
text: String to be drawn
org: Tuple(x,y) Bottom-left corner of the text string in the image(文本的左下角坐标)
fontFace: 字体
fontScale: 字体大小
color, thickness, lineType: 同👆
bottomLeftOrigin: 当其为真时,图像原点在左下角,否则在左上角(opencv默认为左上)【如果为True,字翻转$180^o$】
1 | |
6 示例
1 | |
本博客所有文章除特别声明外,均采用 CC BY-SA 3.0协议 。转载请注明出处!