git hooks自动部署hexo
本文最后更新于:Wednesday, August 5th 2020, 5:57 pm
git hooks 自动部署hexo
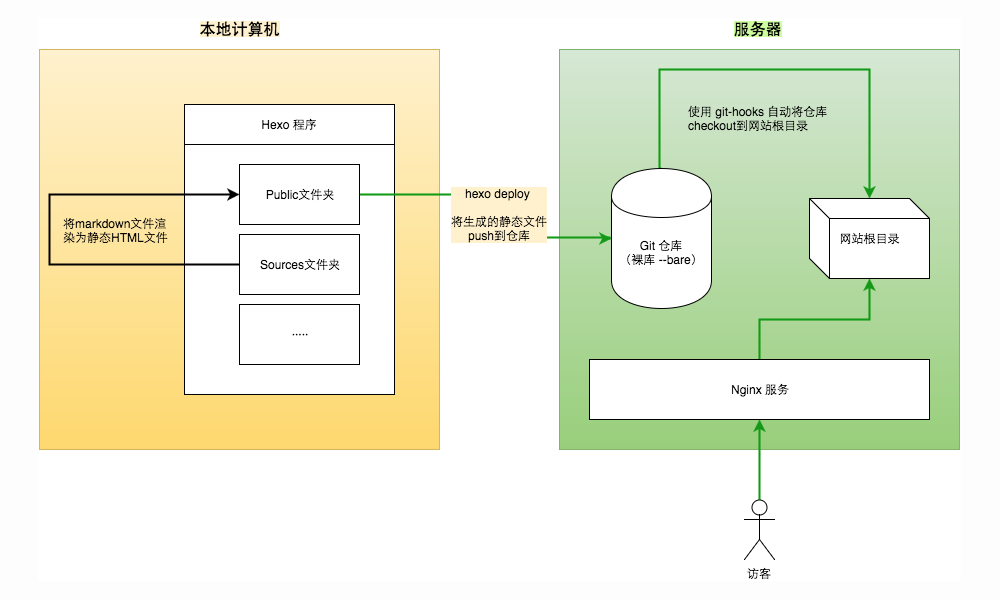
1、原理大致如下
2、实施过程
在服务器上搭建一个git服务器1
adduser git(创建一个用户)可以给创建的用户设置密钥
passwd git赋予git用户sudo权限
1
2
chmod 740 /etc/sudoers
vim /etc/sudoer
1
2
3
4
5
6
7
8
9
10
11
12
13
14
`给git用户添加命令权限如下`
保存后退出,修改回文件权限`chmod 440 /etc/sudoers`

2. 初始化git仓库
```bash
su git //切换至git用户
mkdir blog.git //创建仓库文件夹
cd blog.git //进入文件夹
git init --bare //使用--bare参数初始化为裸仓库,这样创建的仓库不包含工作区
创建网站目录
1
2
3
sudo mkdir /var/www/blog //创建网站根目录
sudo chown -R git.git /var/www/blog //把blog目录以及子目录属组改为git
(这一步很重要,否者后续提交没有权限)配置密钥[详情见:ssh协议](https://www.beenli.cn/posts/782a8ece/
1
2
3
mkdir .ssh //创建.ssh目录(默认你在git用户的~目录下)
cd .ssh
touch authorized_keys //把你本地生成的公钥拷贝到此文件夹种配置
hooks(git 用户下)21
2
3cd ~/blog.git/hooks //切换到hooks目录
touch post-receive //创建post-receive文件
chmod +x post-receive //赋予其可执行权限The
post-receivehook runs after the entire process is completed and can be used to update other services or notify users. It takes the same stdin data as thepre-receivehook. Examples include emailing a list, notifying a continuous integration server, or updating a ticket-tracking system – you can even parse the commit messages to see if any tickets need to be opened, modified, or closed. This script can’t stop the push process, but the client doesn’t disconnect until it has completed, so be careful if you try to do anything that may take a long time.复制该段代码到刚刚创建的post-receive文件
1
2
3
4
5
6
7
8
9
10
11#!/bin/bash
echo "post-receive hook is running..."
GIT_REPO=/home/git/blog.git
TMP_GIT_CLONE=/tmp/blog
PUBLIC_WWW=/var/www/blog
rm -rf ${TMP_GIT_CLONE}
git clone $GIT_REPO $TMP_GIT_CLONE
rm -rf ${PUBLIC_WWW}/*
cp -rf ${TMP_GIT_CLONE}/* ${PUBLIC_WWW}在执行
cp(复制)命令的时候,.git作为隐藏目录不会被拷贝到 Web 根目录下,也就避免了将整个仓库历史暴露在 Web 服务中。最后配置hexo的
_config.yml1
2
3
4deploy:
type: git
repository: git@VPS IP:/~/blog.git # 默认22端口
branch: master
Reference
[1] Hexo 博客部署到 VPS
[2] git hooks
本博客所有文章除特别声明外,均采用 CC BY-SA 3.0协议 。转载请注明出处!