上世纪80年代早期,高性能计算机的设计很大程度上是数据驱动的。例如对指令使用情况的分析发现在真实的机器上,不是每种指令都是以相同的频率被执行。设计人员利用这一观察来优化这些机器的具体实现。但是,这种直接的测量属于后设计操作步骤,并不总能在设计阶段帮助优化。作为替代方案,架构师们使用分析模型来预测性能,它们在初始阶段剔除一部分设计空间是成功的,但是在评估更复杂的设计权衡时不是那么奏效。
随着工艺节点的进步,片上能塞进更多的晶体管,计算机系统可以变得十分复杂。早在2004年,由于风冷芯片最大功耗和无法有效地开发更多指令集并行这两大孪生瓶颈,Intel取消自己的高性能单核处理器项目转向多核心开发。面对多核心,更深的存储层次,异构计算等日益复杂的计算系统,设计师们开始诉诸仿真模型在项目初期预测机器性能。
这些仿真模型大多使用高层次编程语言来编写,例如C或者C++。它们不仅要保证很高的评估保真度,而且在仿真速度上要比RTL高几个数量级。常见的性能仿真器有:Rsim, Simics, SimpleScalar和 Asim
| 仿真器 | 特点 |
|---|---|
| Rsim | 仿真使用共享内存的ILP处理器的多核系统 |
| Simics | 全系统模拟器,用于以高性能速度运行目标硬件的未更改二进制文件 |
| SimpleScalar | 计算机系统建模的基础设施(仿真框架) |
| Asim | 一个性能模型框架,Asim 将 SimpleScalar 的重用理念扩展到模拟器本身内的细粒度模块化组件 |
2 gem5简介2
2.1 gem5是什么
The gem5
simulatoris amodular platformfor computer-system architecture research, encompassingsystem-levelarchitecture as well asprocessor microarchitecture3
2.2 为什么使用gem54
运行真实的负载(比如运行像Linux,Android等复杂的负载)提供系统级别的视野(比如设备之间的交互,操作系统交互)挂载定制的模型(gem5提供了封装有通用外设接口的基类,开箱即用的常见硬件模型)早期快速原型验证(通过参数化的模型使能快速设计空间探索)gem5在工业和学术界有大量的用户群体(自从2011年合并以来,gem5 已被 2900 多篇出版物引用)
2.3 gem5设计特色
设计gem5时使用了很多卓越软件工程实践的方法:
无处不在的面向对象,集成Python,领域特定语言(DSL)和标准的接口
可扩展性是gem5模拟器一个重要的目标,也是它成功的关键因素。而这种特性很大一部分是通过底层C++代码面向对象设计实现的。也正是由于gem5扩展性好,可以满足不同仿真任务的需求。例如,当一个想法从高层次的概念到具体的设计实现孵化过程中,架构师需要一个能在不同抽象层级上仿真的工具,兼具仿真速度和正确性。一个细粒度的门控实验可能需要详细的CPU模型,而对多核的建模不是必须的;与此同时一个高度可伸缩互连模型可能需要多个CPU,但是这些CPU没必要建模太多细节。此外,随着时间的推移,通过长期使用一个仿真配套设施,架构师能够以更少的开销更快地完成更多的工作。Python集成使得gem5的配置变得更加灵活,同时对用户的接口也更加友好。python主要完成仿真对象配置,初始化,构建系统的拓扑结构和仿真流的控制。DSL的使用使得gem5在ISA和Cache Coherence建模上更加简洁和高效。gem5定义了一个重要的
port interface,Ports用来连接gem5中两个内存对象。内存对象通过一个叫Packet的内存请求对象来传递消息。
2.4 gem5常见的模型
CPU 模型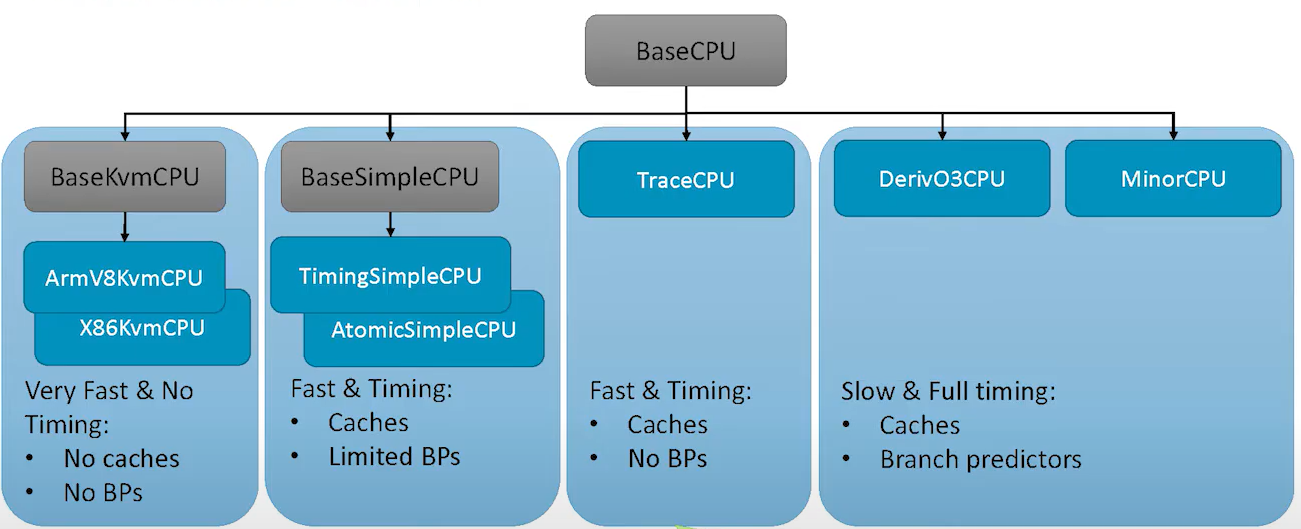
- 从左到右建模得越来越详细,实现的功能也更多,但是仿真速度越来越慢。
系统模式
Full system mode(FS) | 建模完整的计算系统,包括OS和外设。还需要建模中断,异常,特权指令,故障处理 |
|---|---|
System-call Emulation mode(SE) | 只用建模用户可见的ISA,加上常见的系统调用(通常通过调用主机的OS) |
内存 模型
- gem5提供两种内存模型:
Classic和Ruby - 在上图的例子中不需要使用Ruby选项运行gem5。但是如果研究缓存一致性协议,则可能需要使用Ruby模型,因为它提供了扩展性好的内存系统(SLICC用于缓存协议的领域专用语言),详细的统计数据和部件仿真模型。
- gem5提供两种内存模型:
3 gem5开发介绍
几乎所有的gem5仿真对象使用C++编写,外面用Python包裹。gem5使用pybind11工具完成C++对象和Python对象之间的绑定,而整个项目的编译则由Scons构建工具完成。
3.1 gem5编译
下载gem5源代码(写此文时最新稳定版本为v21.0.1.0)
git clone https://gem5.googlesource.com/public/gem5编译gem5
首先根据官方介绍下载依赖(主要有python3和scons)
进行编译(可以选择
gem5/build_opts下任意一个ISA和缓存一致性协议进行编译)1
python3 `which scons` build/ARM/gem5.opt -j $(nproc)上面使用的ARM ISA进行编译,并编译了所有的CPU model,也可以修改
gem5/build_opts/ARM,只编译一部分CPU模型。gem5有五种二进制类型:
debug,opt,fast,prof和perf。具体差别见官网介绍。通常使用opt类型。
3.2 创建gem5仿真对象
gem5 中的所有主要仿真组件都是继承
SimObjects, 并都具有配置、初始化、统计和序列化(检查点)的常见行为。每个仿真对象由两个类代表,一个在C++中,一个在Python中。所有的仿真对象需要放在
gem5/src目录下面,每次修改后需要重新编译,才能在仿真脚本中引用得到。
Python file
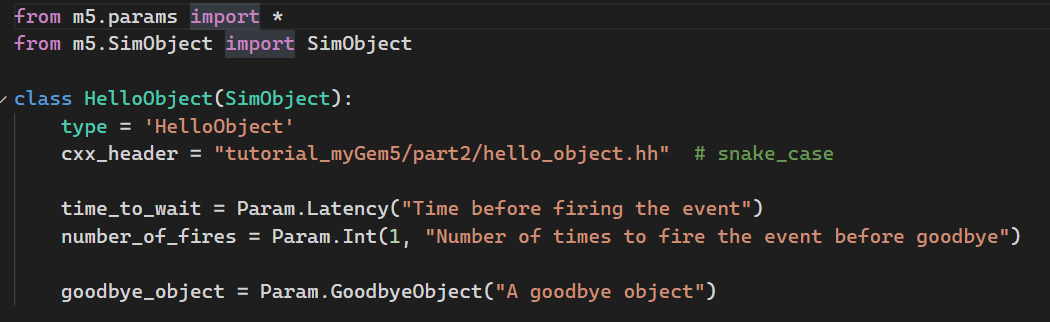
- 创建一个与C++对象同名的类,并继承SimObject
- 指明C++头文件位置(相对gem5/src目录的位置)
- 声明该对象可配置的参数,并可以赋予初值。(第一次参数为初值,第二参数为说明)
C++文件(一个头文件声明,一个文件进行函数实现)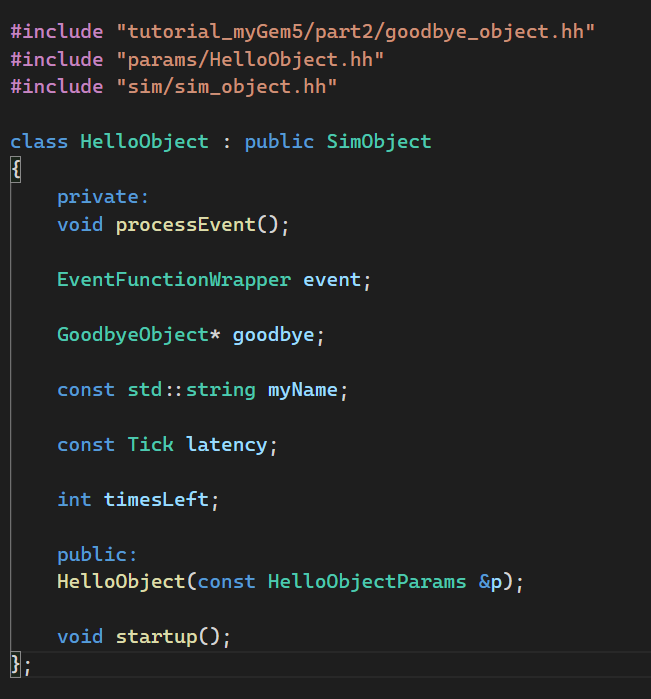
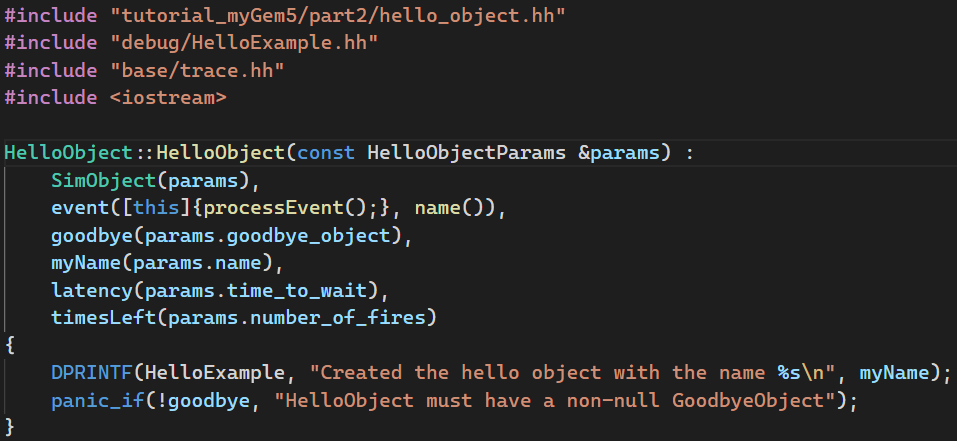
- C++对象继承SimObject,同时使用
member initializer lists(成员初始化列表)给类成员在构造函数中赋初值 - gem5有一种机制,根据python对象名自动创建一个
xxxParams类,并且该类包含了python文件中给的初始值。
- C++对象继承SimObject,同时使用
SConscript文件(类似cmake中的CMakeLists.txt)
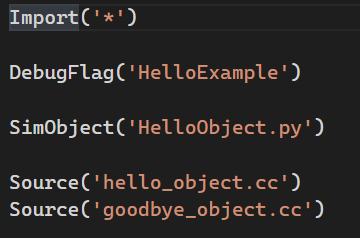
- SConscript相当于python脚本,可以写任何符合python语法的程序。
- Import,DebugFlag,SimObject, Source都是Scons提供的方法,便于用户使用。
3.3 仿真配置脚本
gem5 源代码提供了很多实用程序和通用的配置脚本文件,都放在gem5/config/目录下。
首先引入仿真对象
1
2
import m5
from m5.objects import *创建一个
root对象,系统中所有对象都是它的子对象(注:通常所有对象挂载在root.system层次下面,本次实验为了简单,没有使用system对象)1
root = Root(full_system = False)实例化一个HelloObject对象,并挂载在root下面(gem5中内存对象至少有一个slave或master端口,当python中用=操作符进行连接时,底层调用端口连接函数)
1
2
root.hello_test = HelloObject(time_to_wait='2ns', number_of_fires=10)
# 可以通过配置脚本覆盖参数的默认值系统搭建完毕后就可以仿真
1
2
3
4
m5.instantiate()
print("Beginning simulation!")
exit_event = m5.simulate()
print('Exiting @ tick %i because %s' % (m5.curTick(), exit_event.getCause()))3.4 开始仿真
仿真命令类似如下:
build/ARM/gem5.opt --debug-flags=HelloExample configs/learning_gem5/part2/hello_goodbye.py
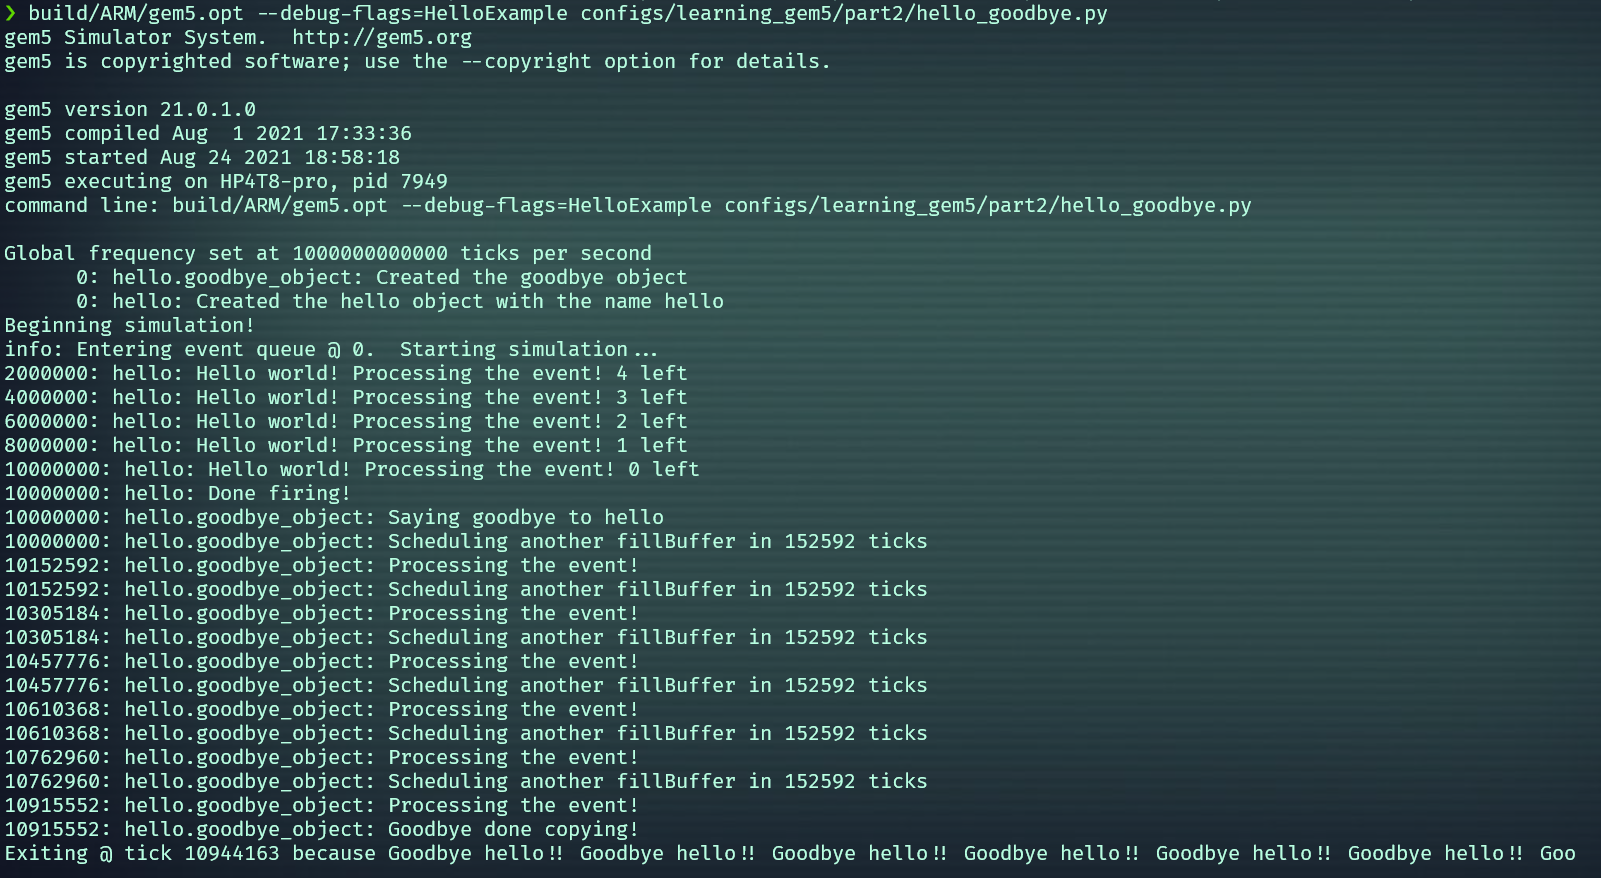
完整的实验步骤请参考官网教程
4 DVFS背景
DVFS全称为动态电压频率缩放,是一种重要的电源管理方法。本部分内容主要来自2013年的一篇论文3
想要在gem5中模型DVFS需要做哪些东西呢?
- 硬件支持
- CPU等硬件支持多频率电压工作
- 需要设计一个DVFS controller与软件交互
- 软件支持
- 通常Linux上已经存在DVFS governor可以复用(高层次模块)
- 我们只需要设计底层驱动,特定于硬件
- 功耗评估模型
- 实时统计系统功耗,输入给温控系统
- 比较DVFS策略的能耗效率
4.1 DVFS controller
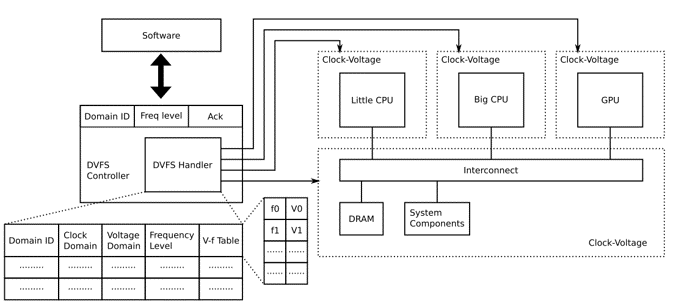
- 外部提供三个寄存器:
domain_id(每个时钟域下可以有多个仿真对象),Freq level(从012开始编号,编号越小频率越高),Ack(只读寄存器,读完清零,当当前转换完成时硬件置1) - 内部记录各个时钟域的相关信息,并响应请求进行时钟电压的变换。
- 还需要抽象一个
DVFS Handler仿真对象(不是IO设备),方便用户将时钟域配置进去。
4.2 Linux cpufreq driver
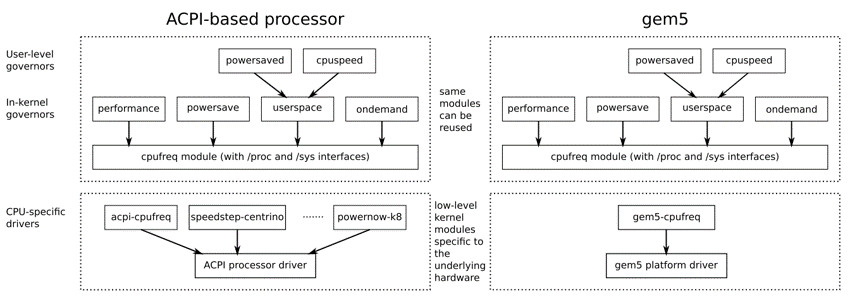
- Linux内核一般有DVFS管理驱动程序。
performance: 始终以最大频率运行;powersave: 始终以最低频率运行;userspace:用户自行调整频率,通过向scaling_stepeed文件写入频率值。ondemand:系统根据负载需要自行调整频率。 - 下层驱动需要与dvfs controller交互,同时给上层管理程序提供服务。这部分特定于硬件实现,但是只要符合上层驱动的接口规范,就可以不用修改地复用上层模块。
- 当需要模拟不同的电压-频率点时,只需要修改设备树文件,底层驱动从设备树文件初始化硬件,而不需重新编译下层驱动。
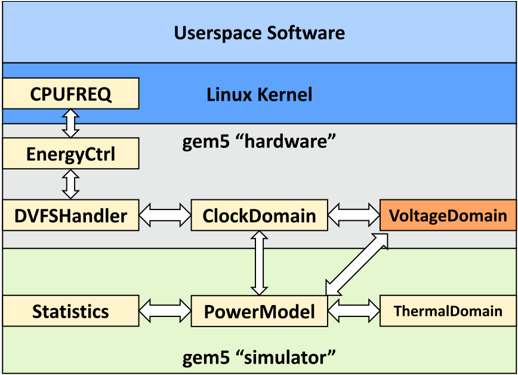
4.3 power model
gem5是个模块化的系统,通过累加每个模块的能耗得出整体的能耗。每个模块分为5种电源状态,每个状态又分别由动态功耗和静态功耗组成。模块处于何种状态由系统决定,模块每种状态下计算功耗的公式人为给定。
5 DVFS实验
本次实验主要参考官方教程中的ARM power Modelling和ARM DVFS Support
目前最新版本(v21.0.1.0)的gem5已经内置了DVFS controller,并且提供了DVFS_Handler仿真对象
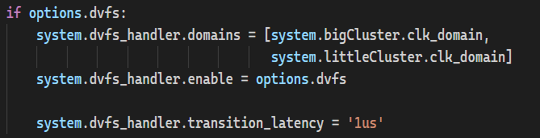
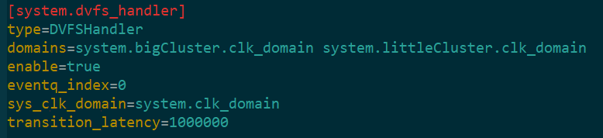
在系统仿真配置文件中使能DVFS_Handler,并将需要模拟的时钟域注册进去。
当前系统参数文件见:
gem5/m5out/config.ini或者config.json文件
gem5官方提供的修改过后的Linux版本内置了DVFS底层驱动
- 当gem5以全系统模式仿真时,通过设置不同DVFS governor,即不同的策略,来实现动态的电压频率缩放。
- 本次实验使用的v4.4内核,底层驱动为
arm-gem5-mc

5.1 功耗估计模型
下面代码见gem5/configs/example/arm/fs_power.py文件
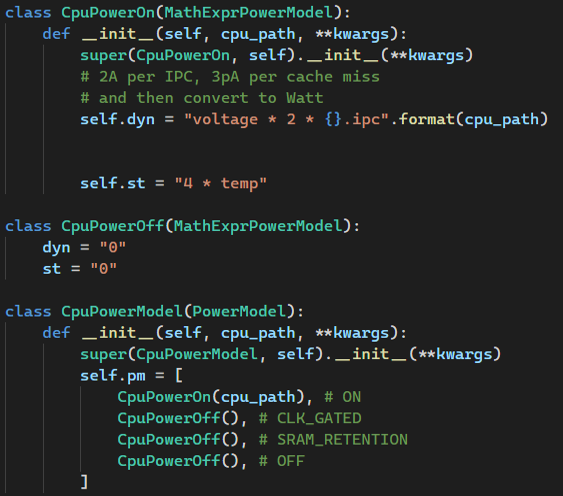
gem5提供的
MathExprPowerModel类,用于用公式表达一种电源状态下模块的动静态功耗。gem5提供的PowerModel类用于封装模块4种状态下的功耗模型。每个模块一般都会有各种统计信息可以用于功耗公式中,例如CPU模块的统计参数见:
gem5/src/cpu/base.cc中的ADD_STAT(numCycles, UNIT_CYCLE, "Number of cpu cycles simulated")等。Cache模块的统计参数见:gem5/src/mem/cache/base.cc中的ADD_STAT(overallMisses, UNIT_COUNT, "number of overall misses")等。如果遇到
fatal: Failed to evaluate power expressions: [...],多半是因为当前模块没有该统计参数或者名称输入错误。解决办法:用vscode打开gem5/src文件夹,然后搜索ADD_STAT(xxx),查看当前参数在哪个类中定义;或者查找相近的统计参数名称进行比对。
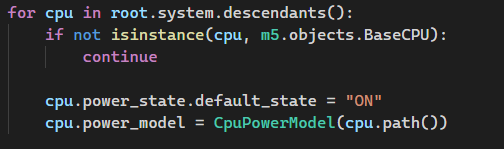
将之前定义的
CPUPowerModel类注册到系统中所有CPU中,这样全系统仿真时才会有CPU的功耗统计结果。最后,可以设置每间隔多长时间,dump一次统计数据(👇使用间隔为0.01s仿真时间,默认为1s)
m5.stats.periodicStatDump(m5.ticks.fromSeconds(0.1E-1))5.2 设置时钟-电压域
- 电压域包含在时钟域里面
- 电压域如果是单值——时钟域可以是单值也可以是多值
- 电压域如果是多值——时钟域必须是多值,且项数与电压域匹配(使用降序)
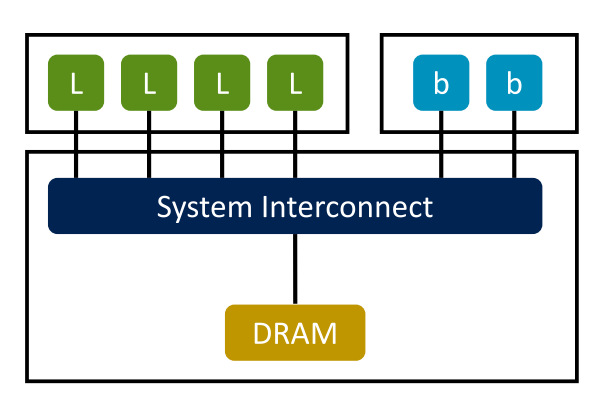
- 首先在gem5/configs/example/arm/devices.py中的
CpuCluster类中self.clk_domain中,加入domain_id=system.numCpuClusters(),因为domain_id必须唯一。(当系统实例化bigCluster时domai_id=0,接着实例化littleCluster时domain_id=1)

接在在gem5/configs/example/arm/fs_bigLITTLE.py,加入对大小核时钟和电压的命令行参数输入。
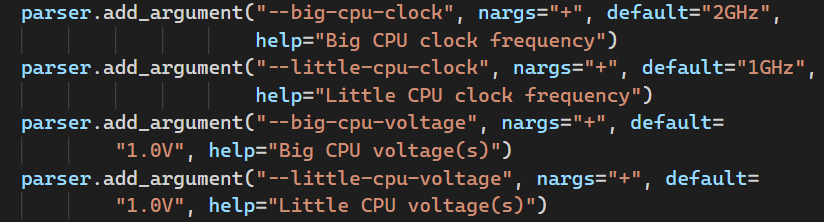
将电压和频率配置进
CpuCluster中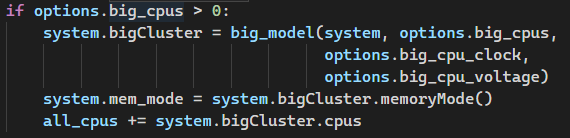
5.3 全系统仿真
1 | |
- 设置debug-flags为
dvfs_handler和EnergyCtrl - 设置debug-file为dvfs_debug.log,此文件将记录系统初始化DVFS,频率切换过程等
- —kernel指定内核,本次实验使用的是v4.4。
- 可以使用—disk设置镜像文件位置,脚本默认镜像为aarch64-ubuntu-trusty-headless.img,可以通过网址下载。
- 需要设置
M5_PATH环境变量,该目录包含两个文件夹,分别为binary和disk,把编译好的内核vmlinux复制到binary文件夹下,下载好的镜像复制到disk文件夹下。
另开一个终端,输入命令
telnet localhost 3456,等待两到三小时后(因为默认大核使用的O3 CPU,小核使用的Minor CPU,所以启动Linux很慢),进入Linux命令行,输入root即可。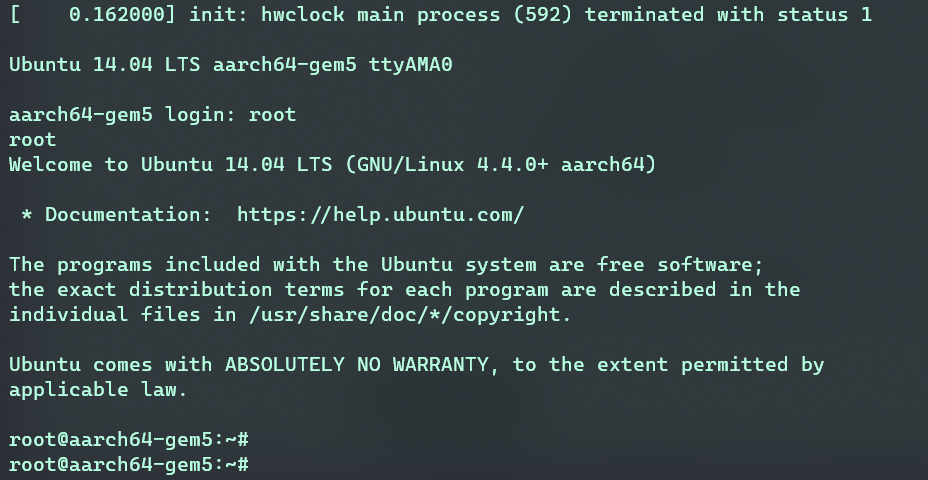
进入cpufreq目录(dvfs内核接口)
1
2
> cd /sys/devices/system/cpu/cpu0/cpufreq
> ls该目录下有很多与dvfs有关的信息文件,比如
scaling_driver即底层驱动名称,scaling_governor为高层驱动名称。cpuinfo_tarnsition_latency为频率调整时间,cpuinfo_cur_freq为当前CPU频率等。
1
> cat scaling_available_frequencies
1
2
3
4
> echo "userspace" > scaling_governor
> cat cpuinfo_cur_freq
> echo "3003003" > scaling_setspeed
> cat cpuinfo_cur_freq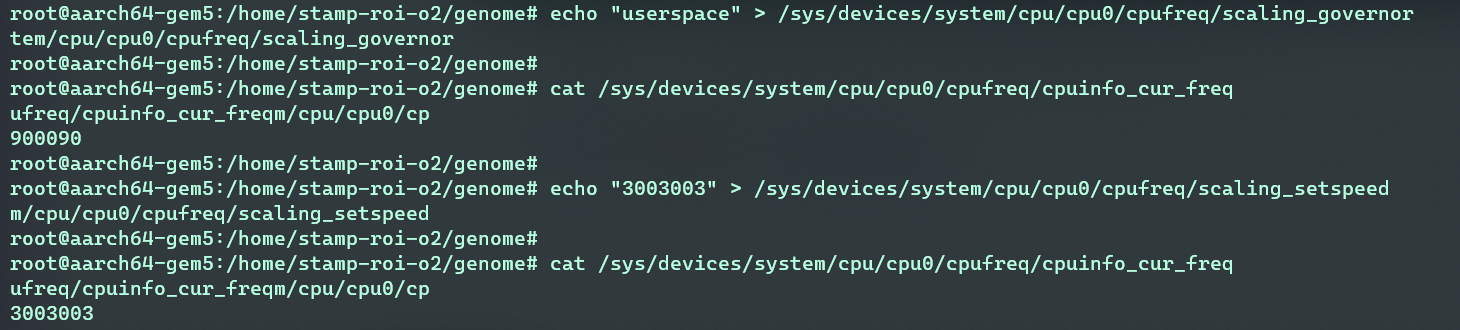
5.4 Benchmark比较
通过跑stamp-roi-o2/genome/genome_roi_lock来比较
performance和Ondemand不同调度策略的效率。
在5.3节中我们已经进入仿真系统的Linux命令行,由于Linux默认调度程序为
perfermance,所以先保存一个检查点。1
> m5 checkpoint保存的检查点文件夹在gem5/m5out下,一般以cpt.xxx命名的目录下(xxx为从仿真开始到执行checkpoint这段时间的时钟tick数)
然后,调整scaling_governor为ondemand后,再保存一个检查点。
1
2
> echo "ondemand" > /sys/devices/system/cpu/cpu0/cpufreq/scaling_governor
> m5 checkpoint从
perfermance恢复,然后开始执行程序1
2
3
4
5
6
7
8
9
10
11
12
13
14> build/ARM/gem5.opt \
--debug-flags=dvfs_handler,EnergyCtrl \
--debug-file=dvfs_debug.log \
configs/example/arm/fs_power.py \
--kernel=../full_system_for_gem5/binaries/vmlinux_4.4 \
--cache \
--dvfs \
--big-cpu-clock 3GHz 2GHz 1GHz 900MHz \
--big-cpu-voltage 1.0V 0.9V 0.8V 0.5V \
--little-cpu-clock 2GHz 1GHz 800MHz 500MHz \
--little-cpu-voltage 1.0V 0.8V 0.6V 0.5Vs
--retore-from m5out/performance
> ./genome_roi_lock -g256 -s16 -n16384 -t1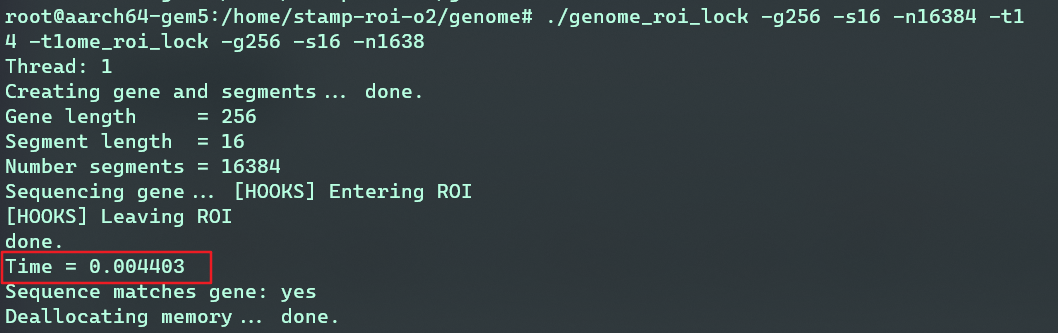
再开一个窗口,查看gem5统计的数据(
gem5/m5out/stats.txt)1
> cat -n stats.txt | grep -E 'system.bigCluster.clk_domain.clock|simSeconds|system.bigCluster.cpus.power_model.dy*|system.bigCluster.cpus.power_model.st*'
从
ondemand中恢复,然后开始执行程序1
2
3
4
5
6
7
8
9
10
11
12
13
14> build/ARM/gem5.opt \
--debug-flags=dvfs_handler,EnergyCtrl \
--debug-file=dvfs_debug.log \
configs/example/arm/fs_power.py \
--kernel=../full_system_for_gem5/binaries/vmlinux_4.4 \
--cache \
--dvfs \
--big-cpu-clock 3GHz 2GHz 1GHz 900MHz \
--big-cpu-voltage 1.0V 0.9V 0.8V 0.5V \
--little-cpu-clock 2GHz 1GHz 800MHz 500MHz \
--little-cpu-voltage 1.0V 0.8V 0.6V 0.5Vs
--retore-from m5out/ondemand
> ./genome_roi_lock -g256 -s16 -n16384 -t1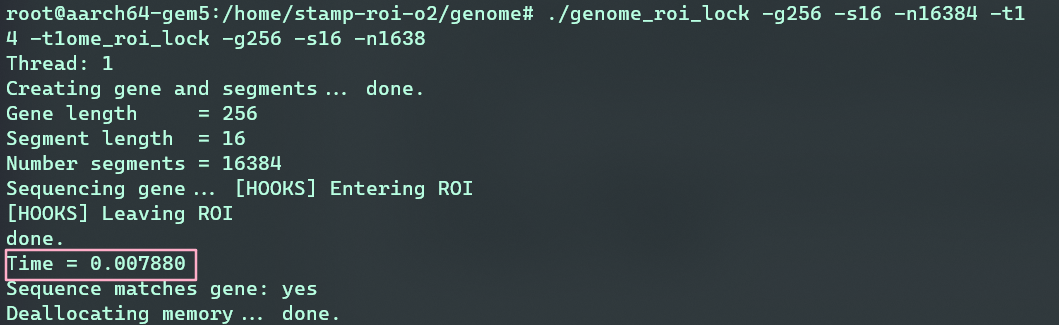

从statistic可以看出,在跑程序之前CPU工作在最低频率下,即图中的clock=1111(900MHz);当进入程序时,governor将CPU频率从1111变化到333(即3GHz),以最高频率工作。当工作完成后,CPU继续以3GHz进行程序的收尾部分,然后在某一瞬间,变化到1GHz(1000),如果后续没有负载则在这个过渡态待一会儿,又将CPU调度到900MHz工作。

结果比较
|
dvfs调度策略| 时间(s) | 动态功耗(w) | 静态功耗(w) |
| :——————: | :———: | :————-: | :————-: |
| performance | 0.004403 | 1.65 | 93.84 |
| ondemad | 0.007800 | 0.05 | 5.3 |- 由于Ondemand将cpu调整到3GHz,有延迟并且需要转换时间,而Performance策略CPU一直在3GHz运行,因此Ondemand运行的时间更长。
- 由于本次实验只是想通过DVFS达到控制频率点的目的,对于CPU还有其它模块的动静态功耗公式只是用单一指标简单示意(比如动态功耗定义成与电压成正比,静态功耗定义成与温度成正比),没有进行详尽的建模和修正,所以计算得到的结果只能比较相对值,绝对值没有意义。
- 在Performance的调度策略下,CPU一直处于最高频率下工作,温度会较低频率更高。因此静态功耗会更高。又因为越高的频率所需的电压越高,其动态功率也会越大,与最后得到的实验结果相一致。
5.5 遗留问题
为什么只有CPU0(即大核)能够应用DVFS,而CPU1(小核)不能动态调整频率。
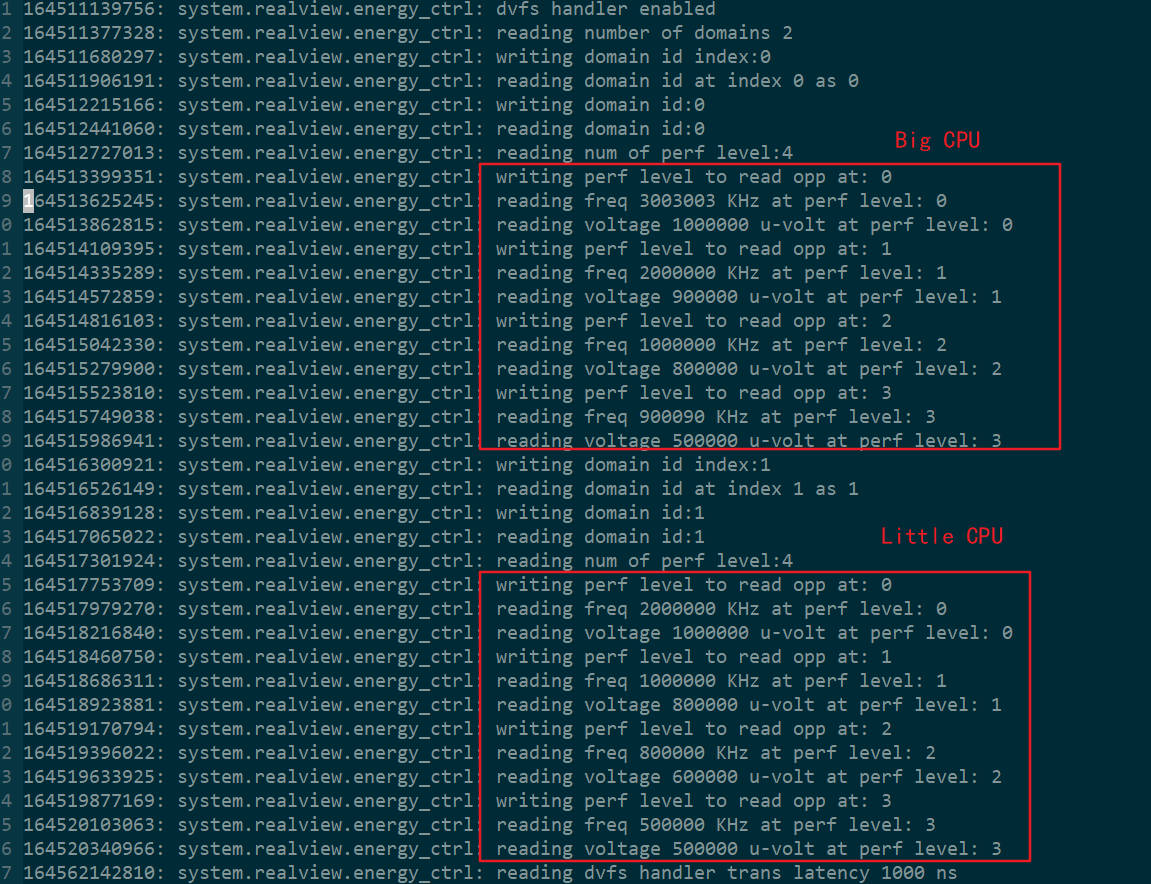
通过查看
dvfs_debug.log文件,可以看到系统成功初始化两个domain域,大核域id为0;小核域id为1。并且初始化的电压-频率点与命令行手动输入的相吻合。由此判断DVFS的底层驱动是正确的。但是/sys/devices/system/cpu/文件夹下只有cpu0提供上层模块用户接口的cpufreq文件夹,而cpu0却没有,猜测可能的原因是目前官方提供的内核的dvfs高层驱动只支持挂载一个域。为什么在performance下运行benchmark只输出一组数据,而在Ondemand下输出四组数据。
通过反复实验观察,gem5会默认每隔1s的仿真时间dump一次数据。可以通过m5.stats.periodicStatDump覆盖默认的dump周期(见5-1)。其次gem5内部实现了一种机制,只要一个域的频率发生了变化就dump一次数据(目前还没有找到办法禁掉该特性)。再者运行benchmark时,在程序ROI结尾也会自动dump一次数据。
6 总结
- gem5是一个高度模块化,参数化的性能仿真器。
- gem5一直在更新迭代,对原有模型进行补充并不断有新的模型和特定应用扩展加入gem5主线
- 通过阅读相关文献,了解到用户在gem5中可以定制化建模硬件,并和其它现有的模型连接成系统,在这个虚拟的系统中运行未经修改或者修改后的操作系统或应用程序。
- 通过DVFS实验,学习到了gem5的全系统模式仿真,命令行参数配置,复杂系统的python配置文件编写等。
参考资料
- [1] Mukherjee, S. et al. “Performance Simulation Tools.” Computer 35 (2002): 38-39.
- [2] Binkert N, Beckmann B, Black G, et al. The gem5 simulator [J]. SIGARCH Comput Archit News, 2011, 39(2): 1–7.
- [3] gem5官方介绍和相关教程https://www.gem5.org/
- [4] Presented by Andreas Sandberg Nikos Nikoleris, Arm at the Arm Research Summit 2017
- [5] V. Spiliopoulos, A. Bagdia, A. Hansson, P. Aldworth, and S. Kaxiras, ‘Introducing DVFS-Management in a Full-System Simulator’, in Proc. 21st International Symposium on Modeling, Analysis and Simulation of Computer and Telecommunication Systems, 2013.